Container Network Interface (CNI) in Kubernetes: An Introduction
One of the most important things in Kubernetes is to make sure network is correctly configured in the cluster, and pods can communicate with each other and the broader internet. In this article, we’re gonna learn about the Container Network Interface (CNI) and CNI plugins, what they’re supposed to do, and how they’re implemented. We’ll also see a simple CNI implementation in Go and Bash, and test it in a Canonical Kubernetes cluster.
Disclaimer: I make lots of mistakes on a daily basis. If you’ve noticed one, please let me know and correct me.
This article is heavily inspired by various amazing resources that I’ll mention in the “Acknowledgement” and “References” sections at the bottom of the article. Make sure to check them out for more details.
Definition & Responsibilities
The CNI (“I” stands for “interface”) is a way for the container runtime to communicate with a networking tool (implementation) to configure the network of the pods and ensure their connectivity. This “interface” is defined extensively in the CNI specification [1].
A CNI “plugin” — which is the implementation of that interface, and is mainly invoked by the container runtime — consists of two main parts:
- An Executable: Responsible for configuring the network of the pod. This is the actual thing that the container runtime invokes.
- A Daemon: Responsible for configuring the routing across the cluster (between the nodes).
In short, the CNI plugin’s job is to make sure pods can communicate with each other seamlessly, whether they’re on the same node, or on different ones. If we want to be a bit more specific, the CNI plugin is mainly responsible for:
- Pod IP address management: Allocating IP addresses to the newly created pods and cleaning them up once the pod is removed.
- Routing configuration: E.g. when the pods want to communicate with the broader internet, or another pod on a different node
- Pod Network Configuration: E.g. Ensuring correct network interfaces are available on the Pod’s network namespace, and pods on the same node can reach each other.
So far it seems like CNI plugins configure network of the pods, not the containers… Let’s see what’s going on here.
Pod or Container?
We’ve been talking about the “Container Runtime Interface plugins”, but seems like they’re responsible for configuring “pod” connectivity. What’s going on here?
So the pods consist of one or more containers that are defined in the pod definition. These containers all share the same network namespace so if we say the “pod IP”, that IP is shared between all those containers.
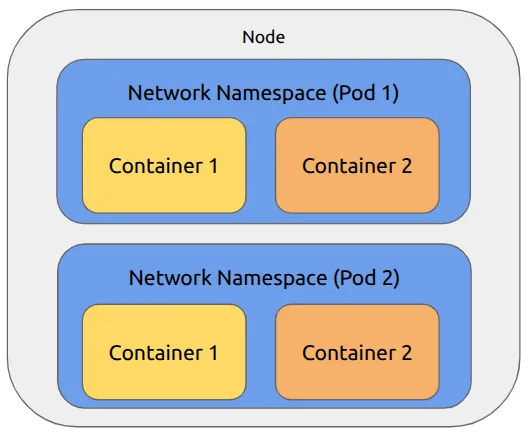
Figure 1: Pods in a node
The CNI plugin, by configuring each “network namespace”, basically configures the pods (and its underlying containers) network and connectivity.
So we know that the CNI plugin is supposed to “configure the pods network”, but how does that really happen? When does the CNI plugin come to play?
CNI Plugin In Action
Let’s look at the following diagram to have a better picture of how and when a CNI plugin gets executed:
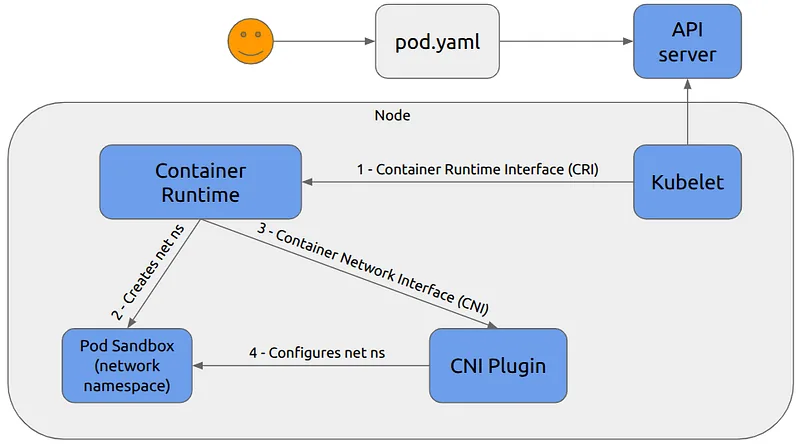
Figure 2. CNI Plugin in action
In a very simple example, when a pod is created using a pod manifest, it’s not yet scheduled on any node, meaning that the nodeName in its definition is not set (asuming the this field was not manually set in the pod manifest by the user). The kube-scheduler will notice this newly created pod that doesn’t still have a nodeName, picks it up, selects the most suitable node for that pod to be scheduled on, and sets the nodeName: selected-node in the pod definition. As soon as this happens, the kubelet on the selected-node will notice this pod definition, and since this pod is not actually running on its node, kubelet will invoke the “container runtime” using the “container runtime interface” (CRI) to proceed with creating that pod (and its underlying containers).
The container runtime, in the first step will create something called a “pod sandbox”. So what is this pod sandbox? When we’re creating a pod, we’re defining one or more containers on that pod’s definition. It’s the container runtime’s job to create those containers. But before it actually creates one of those containers defined in the pod definition, it creates another container that is not in the list of that pod’s containers. I would like to think of this container as a “placeholder”. This very lightweight container, runs the “pause” image [2] and is often referred to as the “pause container” or the “pod sandbox”. The purpose of this pause container is to be a network namespace holder and help with the life-cycle management of the pod.
As an exercise, try to see if you can find this container on a running cluster with tools like
ctrorcrictl. It’s gonna be a bit tricky.
In order to create the pause container or the pod sandbox, the container runtime needs to also create a network namespace — to isolate the pod’s (and its containers’) network from the host (the node). This network namespace is going to be shared between all the containers of our pod, so if we manage to only configure the connectivity of this network namespace, the whole pod’s connectivity will be configured.
Now that the container runtime has created the pod sandbox, it will invoke the CNI plugin executable — with all the required information — to do all the necessary network configuration. After the CNI plugin finishes its work, it will respond back to the container runtime with certain information (e.g. the IP that should be assigned to the pod).
Let’s a dive a bit deeper to see how exactly the CNI plugin binary is called and what it returns as a response.
CNI Plugin Binary Execution
Let’s have a look at the following figure to understand in a bit more detail, how the CNI plugin binary gets called by the container runtime:
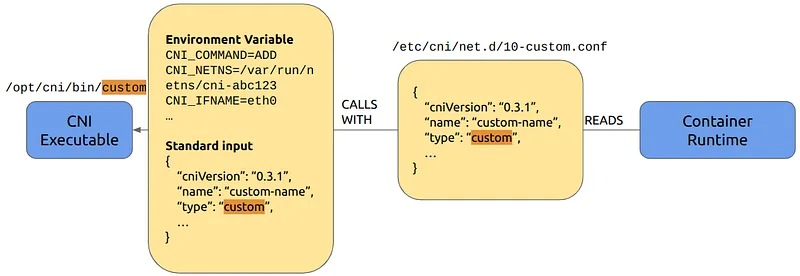
Figure 3. How the CNI executable gets called by the container runtime.
There are two important paths:
- CNI plugin configuration directory: defaults to
/etc/cni/net.d. - CNI plugin binary directory: defaults to
/opt/cni/bin.
The container runtime will first look into the “configuration directory”, and loads the JSON content of the configuration file(s). At the time of writing thie article, containerd expects the CNI plugin configuration files to have specific extensions [3] and their JSON content should have a specific structure [4]. These configuration files should’ve been placed in the correct directory by an external entity (daemon, admin, etc.).
The number of loaded configuration files depends on how we’ve configured the container runtime. As an example in containerd [5], at the time of writing this article, containerd loads all the configuration files it can find in that directory [6]. For the sake of simplicity, we consider that the container runtime is going to load a single CNI plugin configuration file.
In this article we’re only gonna focus on 2 of those fields. The cniVersion and the type. Based on the cinVersion, the container runtime figures out it how it should run the CNI plugin executable in the next step. This version and its implications is based on the CNI specification [1]. The second field that we’re interested in, is type. type is the name of the CNI plugin binary file, located in the CNI plugin binary directory (/opt/cni/bin by default) that the container runtime will execute in the next step.
Now that the container runtime knows the exact binary file that it needs to run, we need to know how that binary file gets executed. Two sources of information are available to the executable:
- Environment variables: These env vars are specified in the CNI specification [1], e.g.
CNI_COMMAND,CNI_IFNAME, etc. - Standard input: A JSON serialized configuration object. Mostly based on the contents of the configuration file found in
/etc/cni/net.d.
Once the CNI plugin binary finishes its job, it returns the results in a specific format [7].
Now that we know how the CNI plugin binary gets executed, let’s have a closer look at what it actually needs to do in order to setup pod networking and connectivity.
CNI Plugin Chain of Action
Before we start, let’s have a look from a high level, what we need to have for the pods to be able to communicate.
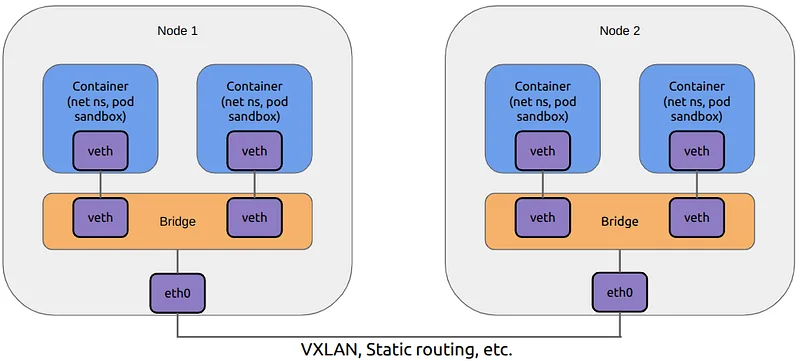
Figure 4. Pod connectivity at a high level
Pods have unique network namespaces that aren’t aware of each other. To ensure pods on the same node can reach each other, we need to create a “virtual ethernet pair” (veth-pair) for each pod (network namespace). This veth pair is just like a portal. Whatever enters one end will immediately comes out of the other end. For each pod, we put one end of its veth pair inside the network namespace, and the other end we will connect to a “bridge”, which is kind of similar to a physical switch. By connecting one end of each veth pair to the same bridge device, we’ll ensure packets from one network namespace can reach the other network namespace, given that both namespaces live on the same node.
But how about pods (network namespaces) on two different nodes? If we ensure correct iptables and routing rules, packets coming from a network namespace on Node 1 can get routed to another namespace on Node 2.
Let’s walk through this process step by step. These steps are roughly going to be the steps that the CNI plugin binary will take in order to setup pod network and connectivity.
Creating the virtual ethernet pair
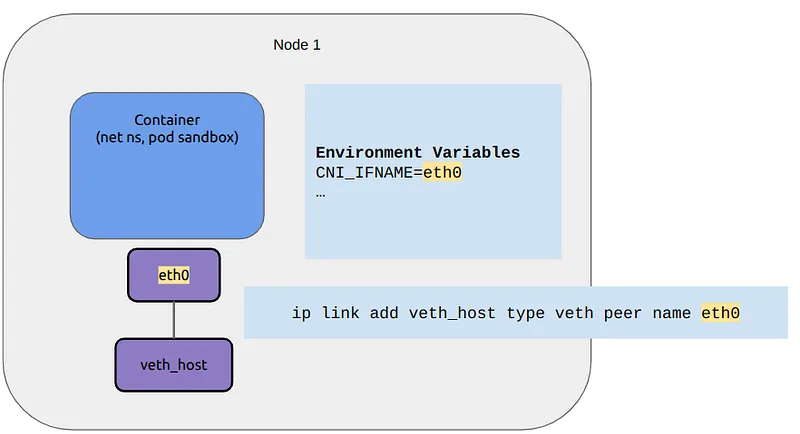
Figure 5. Creating the virtual ethernet pair
Let’s say we’ve just created a pod. As soon as the pod sandbox gets created by the container runtime, the CNI plugin executable gets executed with CNI_COMMAND=ADD in the environment variables.
By looking at this command, the CNI plugin binary knows that it should start setting up the pod network. The first step for that is to create a virtual ethernet pair. The container runtime specifies the network interface name of the veth pair head that is going to be placed in the pod sandbox by passing the CNI_IFNAME environment variable. To create this veth pair we can run:
ip link add veth_host type veth peer name $CNI_IFNAME
The network namespace is created for the sake of isolation from the root network namespace on the node. While this isolation is beneficial and necessary, we still need a way to be able to communicate with a process that is running inside that network namespace, i.e. containers processes. For that to happen, we put one end of the virtual ethernet pair inside the pod sandbox.
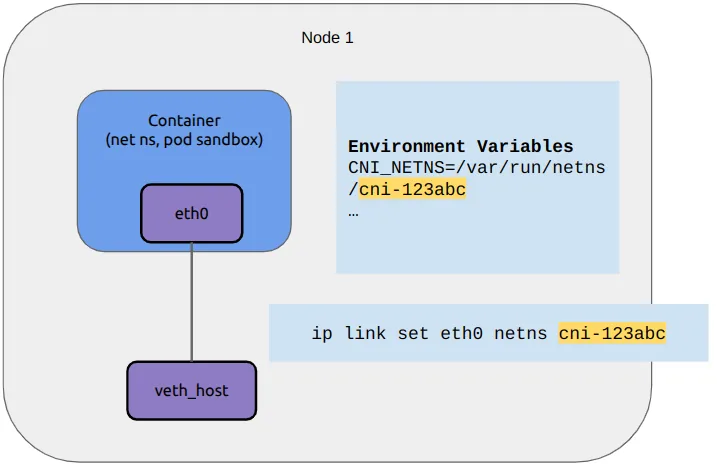
Figure 6. Placing one end of the veth pair inside the network namespace
NETNS=$(basename $CNI_NETNS)
ip link set $CNI_IFNAME netns $NETNS
Assign an IP to the Pod
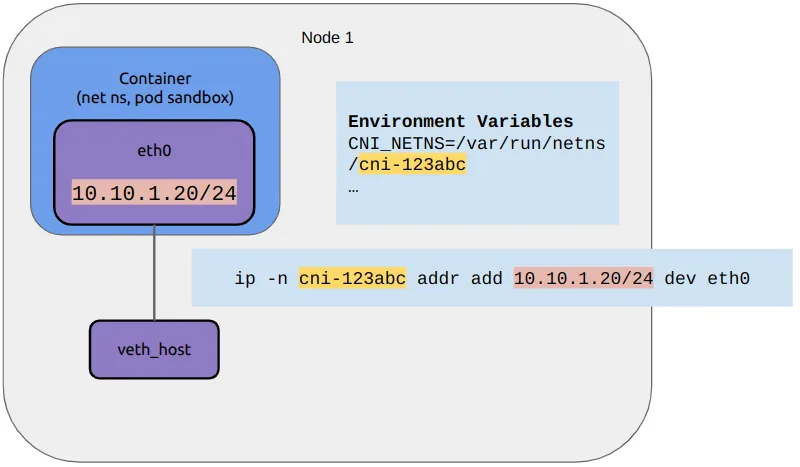
Figure 7. Assigning an IP to the veth end inside the network namespace (pod IP)
We need to assign an IP to the veth pair end that is inside the pod network namespace. This IP is what we will later regard as the “pod IP”, and is displayed when running kubectl get pods -o wide:
NETNS=$(basename $CNI_NETNS)
IP=allocate_ip()
ip -n $NETNS addr add $IP/24 dev $CNI_IFNAME
We also need to allocate an IP from the IP range of the node. IP address management is out of scope for this article but is considered as one of the responsibilities of a CNI plugin.
Creating a bridge
The next step is to create a bridge so that we can connect the veth pair end inside the root namespace of the node to that bridge. This will ensure pods on the same node can communicate with each other.
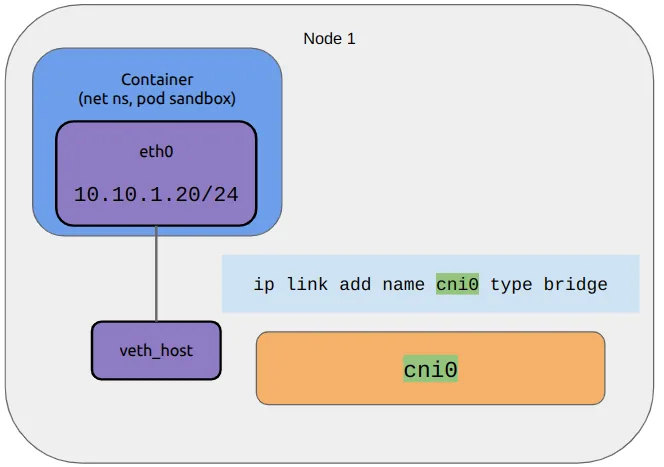
Figure 8. Creating a bridge
BR_NAME=cni0
brctl addbdr $BR_NAME
We also need to assign an IP address to the bridge, and also set this IP address as the default gateway for the pod network namespace.
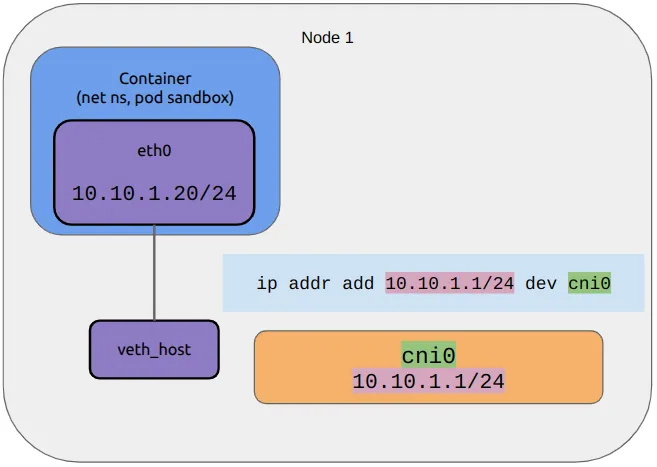
Figure 9. Assigning an IP to the bridge
BR_NAME = cni0
BR_IP = get_br_ip()
ip addr add $BR_IP/24 dev $BR_NAME
And we also need to connect the veth pair head in the root network namespace of the node, to the bridge.
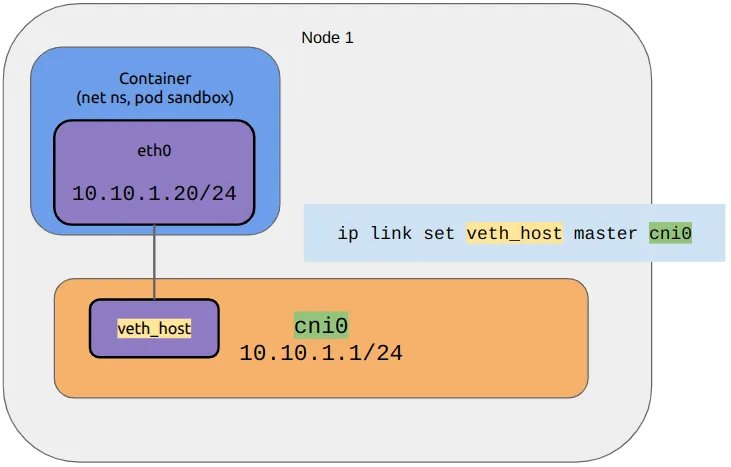
Figure 10. Connecting the veth pair to the bridge
BR_NAME=cni0
ip link set veth_host master $BR_NAME
Finally, we need to set the bridge IP as the default gateway of the pod network namespace.
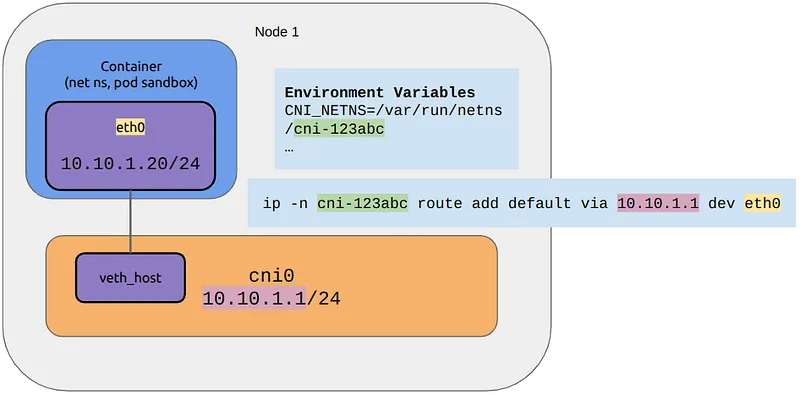
Figure 11. Set bridge IP as the default gateway of the pod sandbox
NETNS=$(basename $CNI_NETNS)
BR_IP=get_br_ip()
ip -n $NETNS route add default via $BR_IP dev $CNI_IFNAME
Finally, we need to accept connections aimed towards the pod IPs, so that they don’t get dropped.
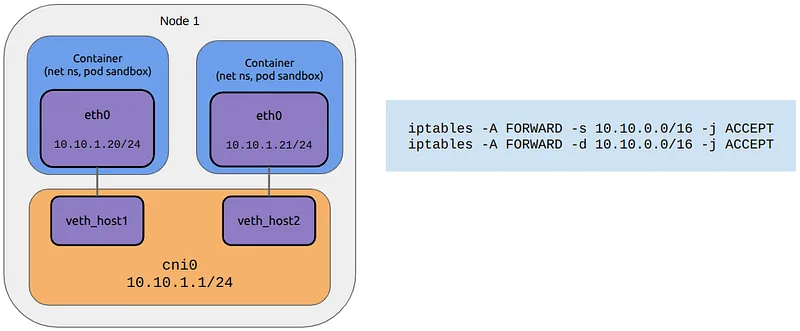
Figure 12. Allow connections to and from pod IPs
iptables -A FORWARD -s $POD_CIDR -j ACCEPT
iptables -A FORWARD -d $POD_CIDR -j ACCEPT
Connectivity between the nodes
To ensure pods on different nodes can communicate with each other, we need to provide some way for packets to travel from one node to another. This can be achieved in many ways, e.g. static routing, VXLAN, etc. However, for the same of simplicity, we select static routing.
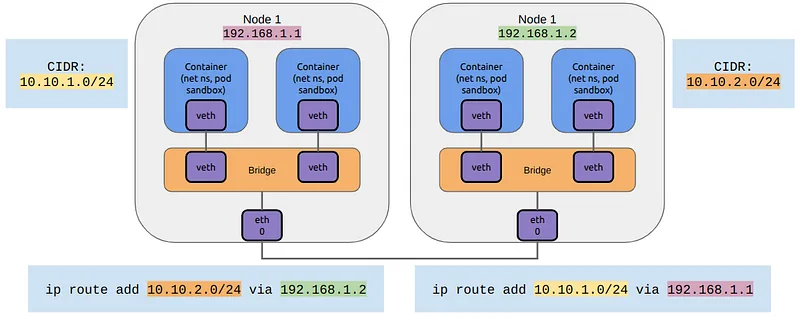
Figure 13. Connecting nodes by static routing
# on node A
ip route add $NODE_B_POD_CIDR via $NODE_B_IP

# on node B
ip route add $NODE_A_POD_CIDR via $NODE_A_IP
Connectivity to the broader internet
The last step is to ensure pods can reach the internet. Right now, packets leaving the pod network namespace, have the pod IP as their source IP, which is a private one. This means that external sources on the internet can not reply back to the pod. We can fix this by performing source NAT which changes the source IP of those packets, to the IP of the node when. It’s important to note that we want to exclude the packets that are headed towards the bridge.
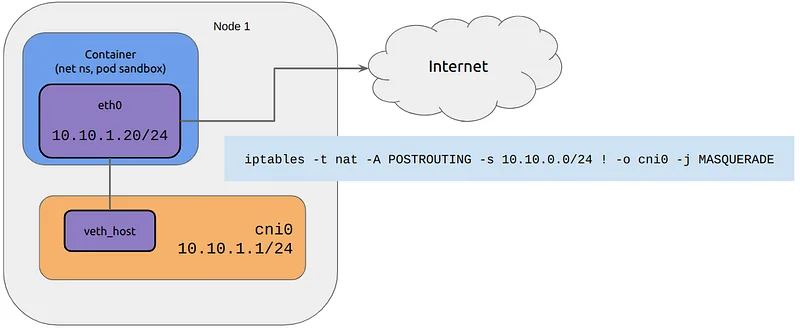
Figure 14. Doing a source NAT to enable pods reach the internet
iptables -t nat -A POSTROUTING -s $POD_CIDR ! -o $BR_NAME -j MASQUERADE
Putting Everything Together
You can find the full implementation of this CNI plugin, plus all the necessary configuration and helper scripts in the following GitHub repo:
GitHub - HomayoonAlimohammadi/microcni: MicroCNI is a minimal container network interface plugin. — MicroCNI is a minimal container network interface plugin. - HomayoonAlimohammadi/microcni
For this demo I chose to run a 2 node Canonical Kubernetes [8] cluster on LXD [9] containers.
lxc launch -p default -p k8s ubuntu:22.04 node1
lxc launch -p default -p k8s ubuntu:22.04 node2
lxc exec node1 -- snap install k8s --classic
lxc exec node2 -- snap install k8s --classic
First we need to bootstrap a cluster with custom configuration so that the CNI plugin does not get installed automatically:
$ lxc shell node1

node1$ cat config.yaml
cluster-config:
  network:
    enabled: false
  metrics-server:
    enabled: false

node1$ k8s bootstrap --file config.yaml
NOTE: The bootstrap configuration file can be found in the GitHub repo, in the demo directory.
Now we need to join the second node to the cluster:
node1$ k8s get-join-token node2
<JOIN_TOKEN>

node2$ k8s join-cluster <JOIN_TOKEN>
Verify that the cluster is up and running (well not quite, since the CNI plugin is not installed):
node1$ k8s status
cluster status:           ready
control plane nodes:      <node1-ip>:6400 (voter), <node2-ip>:6400 (spare)
high availability:        no
datastore:                k8s-dqlite
network:                  disabled
dns:                      disabled
ingress:                  disabled
load-balancer:            disabled
local-storage:            disabled
gateway                   disabled
node1$ k8s kubectl get nodes
NAME   STATUS    ROLES                 AGE  VERSION  INTERNAL-IP
node   NotReady  control-plane,worker  3m   v1.32.2  <node1-ip>
node2  NotReady  control-plane,worker  2m   v1.32.2  <node2-ip>
Now it’s time to place the necessary files in the correct directories. First, from the GitHub repo, we need to either select the Go implementation or the Bash one. If you’ve selected the Go implementation, build the binary by running make in the go directory where the Go module lives.
Whether you’ve selected Bash or Go, the next step is to place the plugin binary in the /opt/cni/bin directory. Also make sure it’s executable and jq is installed on every node:
node1$ /opt/cni/bin# ls -al | grep microcni
-rwxr-xr-x 1 root root     2581 Mar 17 21:08 microcni

node1$ which jq
/usr/bin/jq
And place the microcni.conf in the etc/cni/net.d directory as well. Make sure the type field in the microcni.conf matches the name of the binary (e.g. microcni).
node1$ /etc/cni/net.d# cat microcni.conf
{
    "cniVersion": "0.3.1",
    "name": "microcni",
    "type": "microcni",
    "podcidr": "<node1-pod-cidr>"
}
Now we need to make sure IP routes and iptables is configured correctly. For that, make sure to run the init.sh script (also found in the GitHub repo) on each node, with the correct pod CIDR and IPs for each node:
node1$ chmod +x init.sh
node1$ ./init.sh
node1$ cat init.sh
#!/bin/bash

pod_cidr=<node1-pod-cidr>

#   Allow pod to pod communication
iptables -A FORWARD -s $pod_cidr -j ACCEPT
iptables -A FORWARD -d $pod_cidr -j ACCEPT

#   Allow communication across hosts
#   Uncomment the following lines and replace <other-node-pod-cidr> and
#   <other-node-ip> with the pod cidr and ip of the other node(s)
# ip route add <other-node-pod-cidr>/24 via <other-node-ip> dev eth0
# ...

#   Allow outgoing internet
iptables -t nat -A POSTROUTING -s $pod_cidr ! -o cni0 -j MASQUERADE
Now that we have everything configured, we can go on and create some pods to see if they come up and can communicate with each other and the internet:
k8s kubectl run nginx-1 --image=nginx --restart=Never --overrides='{"spec": {"nodeName": "node1"}}'
k8s kubectl run nginx-2 --image=nginx --restart=Never --overrides='{"spec": {"nodeName": "node1"}}'
k8s kubectl run nginx-3 --image=nginx --restart=Never --overrides='{"spec": {"nodeName": "node2"}}'
First ensure that the pods are up and running:
node1$ k8s kubectl get pods -A
NAMESPACE   NAME      READY   STATUS    RESTARTS   AGE    IP             NODE
default     nginx-1   1/1     Running   0          10m    <nginx-1-ip>   node1
default     nginx-2   1/1     Running   0          11m    <nginx-2-ip>   node1
default     nginx-3   1/1     Running   0          9m     <nginx-3-ip>   node2
Then, to make sure the pods can communicate with each other, let’s hop onto nginx-1 on node1:
k8s kubectl exec -it nginx-1 -- /bin/bash
nginx-1$ apt install iputils-ping
nginx-1$ ping 8.8.8.8 # should be successful
nginx-1$ ping <nginx-2-ip> # should be successful
nginx-1$ ping <nginx-3-ip> # should be successful
Voilà! Pods can communicate with each other both on the same node and on different nodes, and they also can reach the internet.
NOTE: In case things went south, you can investigate the issue by looking at the CNI plugin logs (probably located at /var/log/cni.log, but check the implementation in GitHub to be sure) or the containerd logs:
journalctl -u snap.k8s.containerd | less
Final Thoughts
I really appreciate you taking the time to read this article, and I hope you’ve enjoyed it!
Also, you’re most welcome to connect and say hi on Twitter (X) or LinkedIn.
Further Reading
Seamless Cluster Creation & Management: Canonical Kubernetes v1.32 Stable Is Released — With the release of the shiny new 1.32 stable version, the Canonical Kubernetes solidifies itself as a dependable…
How Canonical Kubernetes CAPI Providers Handle In-Place Upgrades — In-Place Upgrades Design and Implementation in Canonical Kubernetes Cluster API Providers
gRPC Name Resolution & Load Balancing on K8s: Everything you need to know (and probably a bit more) — Load balancing gRPC requests on Kubernetes can be challenging. In this blog we tried to deep dive into the…
Protoc Plugins in Go: gRPC-REST Gateway From Scratch — gRPC-REST gateway is one of the most popular projects in the gRPC-Ecosystem. Let’s implement a simple version of it…
Acknowledgement
This article was only possible thanks to the following amazing resources. Please make sure to checkout these wonderful resources for further details:
- Demystifying CNI: Writing a CNI from scratch — Filip Nikolic [10]
- Kubernetes Networking: How to Write a CNI Plugin From Scratch — Eran Yanay, Twistlock [11]
- Bash CNI Plugin [12]
References
[1] CNI specification — https://www.cni.dev/docs/spec/
[2] Pause image — https://hub.docker.com/r/kubernetes/pause
[3] CNI plugin configuration file extensions — https://github.com/containerd/containerd/blob/4fa7d28/vendor/github.com/containerd/go-cni/opts.go#L213
[4] CNI plugin configuration file structure — https://github.com/containerd/containerd/blob/4fa7d28/vendor/github.com/containernetworking/cni/pkg/types/types.go#L59-L74
[5] containerd — https://containerd.io/
[6] NetworkPluginMaxConfNum — https://github.com/containerd/containerd/blob/edd1cc5/internal/cri/config/config.go#L158-L161
[7] CNI plugin response format — https://github.com/containerd/containerd/blob/4fa7d28/vendor/github.com/containerd/go-cni/result.go#L32-L52
[8] Canonical Kubernetes — https://documentation.ubuntu.com/canonical-kubernetes
[9] LXD — https://canonical.com/lxd
[10] Demystifying CNI: Writing a CNI from scratch — Filip Nikolic — https://www.youtube.com/watch?v=y8Ws3D4rIa0
[11] Kubernetes Networking: How to Write a CNI Plugin From Scratch — Eran Yanay, Twistlock — https://www.youtube.com/watch?v=zmYxdtFzK6s
[12] Bash CNI Plugin — https://github.com/s-matyukevich/bash-cni-plugin